wilburpan
-
Posts
663 -
Joined
-
Last visited
Recent Profile Visitors
2,606 profile views


wilburpan's Achievements
-
Get some weatherstripping tape and attach it around the metal sleeve that the bag slides over. When you install the bag and cinch down the band clamp, the compression of the bag over the foam rubber of the weatherstripping tape will create a tight seal, even if you have pleats.
-
Here’s Peter’s blog: https://pfollansbee.wordpress.com And here’s a fantastic book that he cowrote showing how to make a joint stool using green wood. Even if you don’t like the actual piece, the information on using green wood in a project is terrific. http://lostartpress.com/collections/books/products/make-a-joint-stool-from-a-tree And just in case this might be useful, here’s a link to how I built my Roubo out of 4x4’s. These were kiln dried, but as Shannon pointed out, probably not down to less than 10% due to the fact that it’s construction lumber. http://giantcypress.net/tagged/roubo/chrono
-
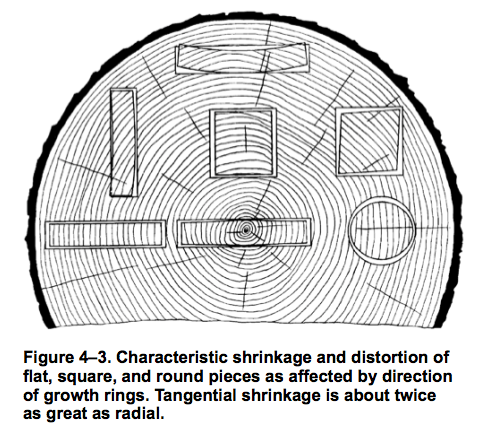
There’s nothing wrong with working with less than fully-dried lumber if you account for future wood movement in the design. Just ask Peter Follansbee. This is what I would do. If your ash lumber is cut in such a way that you can orient the boards for your bench top so that the growth rings wind up running vertically, then go for it. As the boards continue to dry out, they will mainly shrink top to bottom, meaning that you’re going to mitigate any wood movement issues as that process goes forward. In fact, by doing so, you’re essentially making a big laminated quarter sawn slab for your bench top. This is what I did for my bench top, and it’s awesome. If your boards won’t allow you to do that, and you still want to make a Roubo, orient the boards for your bench top so that the heart side of the board is facing upwards. In that orientation, the bench top will tend to move so that it cups on the bottom side (See the top block in the diagram. This is your bench top upside down.). If the bench top moves this way as it dries, the tops of the legs will move inward, causing a splay in the legs, making your bench more stable. In fact, that’s what Roubo says to do with the big slab of wood used to make Roubo benches back in the day. And I’m relatively sure that they didn’t wait until the 20” wide, 6” thick slab was down to less than 10% MC before putting it to use.
-
My bandsaw is a 16” Walker-Turner. The wheels have a flat profile, like the bigger modern Italian bandsaws. I originally had it set up with tires that had a flat profile as well, and used it for resawing running the 3/4” blade that I was using for resawing so that the teeth were off the front edge of the wheel. Later on, I crowned the tires. With the same blade, I found that the bandsaw was much more stable, it was not so finicky when adjusting the top wheel, and I could get better resaw results with less tension, which also easier on the motor. Historically, large bandsaws also had crowned tires, because it works. Even large 36” bandsaws were set up with a crowned profile on the tires. You don’t have to put a huge crown on the wheel to get this effect. With my current setup, the sides of the tire are lower than the middle by a little less than 1/16”.
-
If you have a bandsaw with crowned tires, the blade tracks better. Better tracking = better resaw results. It’s possible to set up a bandsaw with a flat profile on the tires, but they tend to be more finicky and harder to adjust. When a bandsaw blade runs on a crowned tire, the physics of the situation causes the bandsaw blade to automatically ride up to the “highest” point on the tire and stay there until you make an adjustment to the top wheel. The top wheel adjustment tilts the top wheel towards or away from you. Moving the top wheel changes the “highest” point, and causes the bandsaw blade to change position on the tire, and changes the angle the blade takes as it comes off the top wheel towards the bandsaw table. You can take advantage of this phenomenon to eliminate drift. Adjusting the top wheel eventually gets you to a position where the angle of the blade is parallel with the miter slot on the table. If you set your fence parallel to the miter slot, you won’t have to tweak the fence ever again. Just match the tracking of the blade to the miter slot and fence.
-
Balancing or not, the tires will work best if they are crowned. If the profile of the wheels are not crowned, you’re going to have to figure out a way to put that profile on the wheels. I like rubber tires that are glued on better than urethane. Urethane tires are easier to put on, but they can slip off for the same reason that they are easier to put on. I’ve replaced, glued, and crowned rubber tires on a bandsaw. I’ve also paid someone else to do that for me. In the future, I’m perfectly happy to have someone else to this task. And I did ship the wheels to get this done. Should you decide to ship the wheels back to Northfield to take care of the tires, go ahead and have them rebalance the wheels as well. Removing old tires and replacing them can affect the balance of the wheel due to variances in tires and the crowning process. Your bandsaw will run smoother, and you’ll get better resaw results. If you are using this bandsaw as a hobbyist, you won’t have to do this again until you replace the tires a decade from now. So you might as well do it right. By the way, I’m quite jealous that you were able to score a used Northfield bandsaw.
-
Believe it or not, these sorts of joints were made by marking the lines on each piece separately, and then cutting each piece individually. There wasn’t any transferring of lines from one piece to another as in making a dovetail joint. If you think about it, these joints were used to join together long beams, which would have been too big to maneuver around to transfer lines. So the accuracy of the layout was key. You can make things a bit easier for yourself by taking advantage of the parts of the joint that are evenly spaced. On the top, the two stub pieces, the gaps, and the neck of the long stop sign part are even, so divide the beam into five parts and work off of that. On the side, the shoulders are half way down. Finally, and this is going to be different from how you probably are used to marking joints, strike a center line along the length on the faces of the two parts, and use that as your reference in marking the lines for the joint.
-
For bowls, there are two main strategies if you have green wood. The first method is to turn the bowl in two steps. Bill Grumbine’s video shows how to do this. Turn the blank when it’s green down to about 3/4” to 1” thickness, depending on how wide the diameter is, with wider bowls having a thicker wall. Make sure there’s a tenon on the bottom of the bowl. Put the bowl into a paper bag, fold it over, and let it sit a few months or so until its dry. The bowl will go from round to oval during that time, which is why you want the bowl to be relatively thick. Once you go back to the bowl, you’ll turn it a second time, and if things went well, the thickness of the walls of the now oval bowl will allow you to get a thinner round bowl out of it. Finish off the bowl, and you’re done. The second method is to go for it all while the bowl is green. David Ellsworth is a big proponent of this method. Turn whatever bowl you want, with whatever thickness of wall you want at the end. Since the wood is green, it is guaranteed to move as it dries out, even as you’re going through the final steps. David Ellsworth says to just accept that as a part of working with wood. If it goes out of round, or if a part of the wall of the bowl cracks, that’s part of the charm of this sort of turning. Or as a friend of mine says, “If the bowl is imperfect, then it’s art, and I can charge $100 more for it.”
-
I’m lucky enough to have been given the opportunity to talk about Japanese tools for the February meeting of CRAFTS of New Jersey on Sunday, Feb. 1, at the Masonic Lodge on Ridge Road & Dennis Ave., in High Bridge, NJ. There will be tool sellers and tailgating starting at 10:00 am, and my talk is scheduled for 1:00 pm. CRAFTS is New Jersey’s premier antique tool collectors club, and is well known among woodworkers in these parts for their annual spring auction, where Frank Klausz is sure to add to his plumb bob collection. Hope to see some of you there!
-
I’m going to bring this up only because Marc brought this up himself on the Wood Talk podcast #200. Listen to Wood Talk #1. That intro was something else. I wouldn’t judge their entire effort based on a teaser video.
-
If by joinery you mean dovetails, this is a really nice saw for that. http://www.japanwoodworker.com/Product/155673/Joinery-Saw-for-Fine-Work.aspx It’s a dozuki, which usually means that it has crosscut teeth, but this particular dozuki has a modified tooth profile that places raker teeth in line with the crosscut teeth. (Think ATB table saw blade.) This makes it more efficient for rip cuts. If you’re looking for something for tenons, then I’d get a 210mm ryoba.
-
There’s a better option than DMT for diamond plates, either for waterstone flattening or coarse work on a tool. It’s the Atoma 400 grit diamond plate. It also works better than the DMT for quick removal of metal from an edge tool for fixing a nick or initial set up of a plane blade or chisel. More info here: http://giantcypress.net/post/41860013521/atoma-bomb
-
One last attempt to get you to think about vertical storage: unless you plan to run a lot of molding, you don’t need to keep your boards at 16-18 feet long. Consider cutting the boards down. At least for furniture projects, you rarely need very long boards with the exception of dining tables. You can cut your long boards down at obvious places: where there’s a knot or some other defect. Okay, I’ll shut up now.
-
How much height do you have?
-
If you have the height, I’m a big fan of storing lumber vertically. Construction is silly simple. A platform from 2x4s and plywood, some pipe and fixtures that you attach to the wall. Because the platform supports the weight, you don’t have to worry so much about how strong your rack needs to be. Plus, by arranging your lumber vertically, it’s very easy to page through your boards to see which one you want to use. More info here: http://giantcypress.net/post/5388073797/the-worst-part-about-building-a-new-lumber-rack-is